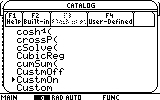
Making Custom Menus
Anyone using the TI89 or TI92(+) calculators frequently, quickly encounters the need to repeat a command or set of characters again and again. Take for example, units: when we use units in expressions, we often enter the same combination of units. How convenient is it to type "_psi*_ft^6/_lbmole^2" or "_m^3*_atm/(_kgmole*_°K)" over and over again? It's not. Wouldn't it be more convenient if we could have a menu for "units" containing the entire combination of units we frequently use? Here's another example: ever used solve( or any other command and added a "|" (with) operator with a line such as " | a=1 and r=10.4 and t=9.01 and e=4" ...? I got tired of typing space-a-n-d-space after the second time I think. On the TI89 this would certainly be tiresome because of the inavoidable necessity to integrate the "alpha" keys into the keyboard. Why not have the sequence " and " (with spaces and all) as a menu label -- say, in menu F1 as the item "1: and " -- so that when we need this sequence we would just type F1, 1 and the entire sequence would be added instantly?
So are you ready to build your own custom menu? Just follow the following simple steps!
Divide the labels you want to create into categories. For example, if you would like to create a special set of unit combinations as described above, you can group that set under the title "Units". If you often need " and " or " or " sequences, or maybe commands like "factor(ans(1))" , " expand(ans(1))" , or perhaps "solve(ans(1)=0,x)", you could group them under the title "Math".
Decide now on the names of categories you would like to have, and the items you would like to have in them. Here is a simple typical arrangement:
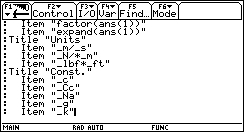
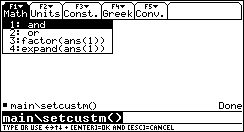
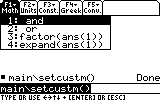
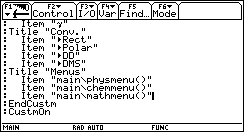
Title: "Math"
Items: " and "; " or "; "factor(ans(1))"; "expand(ans(1))";
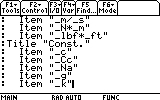
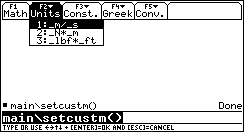
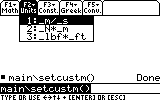
Title: "Units"
Items: "_m/_s"; "_N*_m"; "_lbf*_ft";
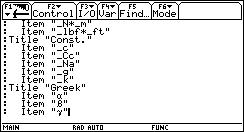
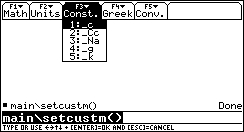
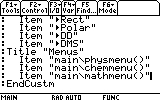
Title: "Const."
Items: "_c"; "_Cc"; "_Na"; "_g"; "_k";
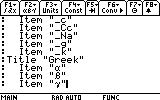
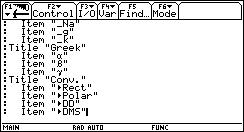
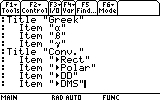
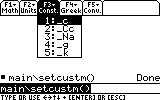
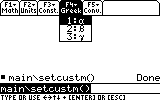
Title: "Greek"
Items: "alpha"; "beta"; "gamma"; (these will, of course, be the real greek letters)
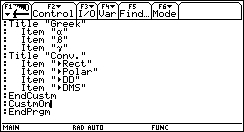
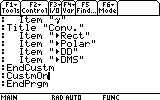
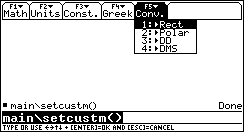
Title: "Conv."
Items: ">Rect"; ">Polar"; ">DD"; ">DMS"; (the > sign is the special unit conversion arrow (2nd+MODE on the TI89, 2nd+Y on the TI92(+))
Now that we know what we want to have in our custom menu, let's understand how we could let our calculator know about it.
We did not work in vain in the previous step, you see, because as it happens to be, the calculator's programming structure of a custom menu is exactly as written above! To be more specific, the title request is simply the word Title followed by the name of the title, and thereafter the list of items, surprisingly preceding each item with the command Item (No doubt the TI-BASIC programmers' imagination is quite a wild one).
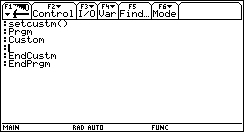
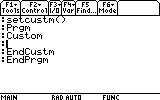
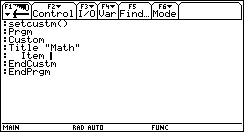
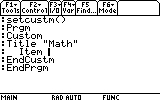
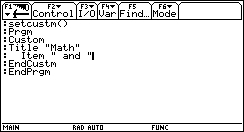
To be even more specific, here is how we would program the above custom menu in the TI's programming language (this is the custom menu will will practice on. You can replace the titles and items with the ones you thought of, and write them instead):
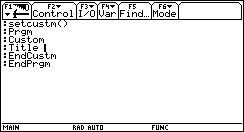
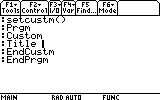
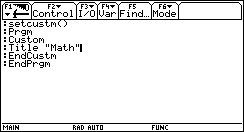
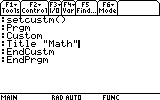
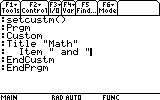
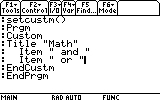
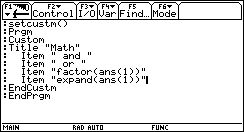
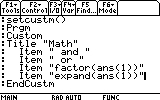
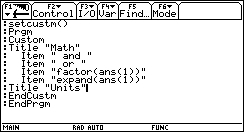
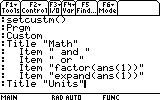
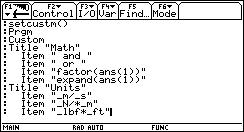
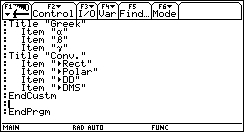
- :Custom
- :Title "Math"
- : Item " and "
- : Item " or "
- : Item "factor(ans(1))"
- : Item "expand(ans(1))"
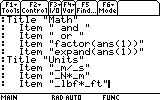
- :Title "Units"
- : Item "_m/_s"
- : Item "_N*_m"
- : Item "_lbf*_ft"
- :Title "Const."
- : Item "_c"
- : Item "_Cc"
- : Item "_Na"
- : Item "_g"
- : Item "_k"
- :Title "Greek"
- : Item "alpha"
- : Item "beta"
- : Item "gamma"
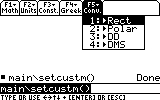
- :Title "Conv."
- : Item ">Rect"
- : Item ">Polar"
- : Item ">DD"
- : Item ">DMS"
- :EndCustm
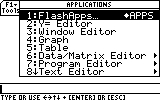
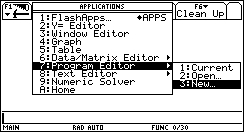
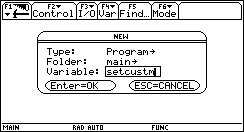
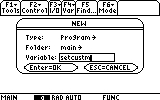
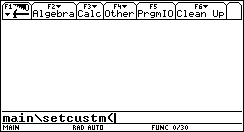
This is where we are going to write the program that will make us a custom menu.
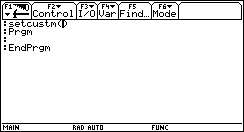
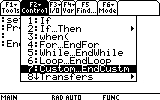
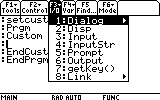
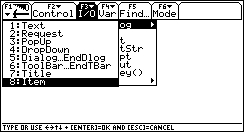
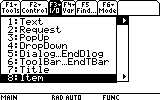
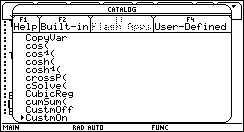
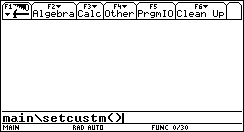
Move the cursor to the first line of this program (the empty line between Prgm and EndPrgm) where we will declare that we are making a custom menu by entring the commands Custom and EndCustm. There is no need to manually type them in -- they are listed in the F2- Control menu.


Well -- that took a while to complete. But don't worry -- it will definetly pay off in future use of your calculator!
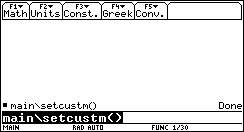
Now that we have completed the program that creates our custom menu, it is time to make it work. Press the HOME buttom to return to the Home Screen.


- You cannot have sub-menus in a custom menu (like in the normal menu). The custom menu just isn't built to provide it.
- You can add as many titles as you like, although there are only eight F kyes. If, for example, you exceed 8 titles, the last title, F8, will be made the transition title, so that pressing F8 will "scroll" the cutom menu to the rest of the titles you've made. This way you can have as many title as you like.
- You cannot directly activate a program from the custom menu. The custom menu is designed so that its items are pasted in the Entry Line. You can, of course, paste the program's name, and then run it as you would always do.
- The custom menu sometimes gives place to the built-in menu (the normal one) when you move to another application, like the Numeric Solver, for example. And it also may not turn back on by itself when returning to the Home Screen. In either case, you can always switch to the custom menu by clicking 2nd+HOME, even in another application! For example, if you need the Greek letters alot when writing notes in the Text Editor, just bring up your custom menu by clicking 2nd+HOME while in the Text Editor. Another click on 2nd+HOME will return the original menu. From my experience, this is a very convenient option, and a great time-saver!
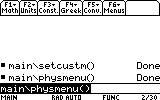
Want to have a different custom menu for physics, chemistry, and mathematics?
No problem! Make a program for each menu; give each program a significant name, for example: physmenu, chemmenu, methmenu. And add an identical last title in each one of them containing the names of the programs that activate each menu. Here's an example: Suppose the menu we've just created was intended to be the physics menu. There are another two menus, called chemmenu and mathmenu and they are added as the last title in physmenu:
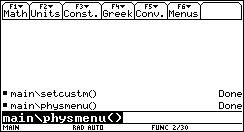
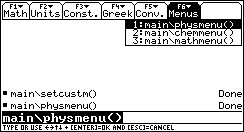
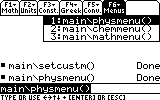
Now, all you need to do is run the menu you want at the particular moment, and since this lest title is available from all the other menus, they are virtually interlinked -- you can run any one of the menus from any other menu at your convenience.
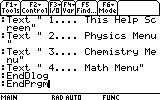
If you want to be even more sofisticated, you can make each custom menu a shortcut program, that can be run with the numeber keys. This way, for our example, we would simply press Diamond+1 and the Physics menu will be activated. Press Diamond+2 -- and the Chemistry menu will turn on, and so on. Make the first shortcut program (kbdprgm1) a program that shows a menu of the available menus. For example:
- :kbdprgm1()
- :Prgm
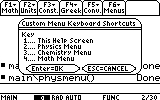
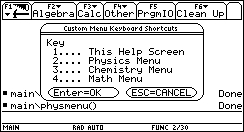
- :Dialog
- :Title "Custom Menu Keyboard Shortcuts"
- :Text "Key"
- :Text " 1.... This Help Screen"
- :Text " 2.... Physics Menu"
- :Text " 3.... Chemistry Menu"
- :Text " 4.... Math Menu"
- :EndDlog
- :EndPrgm